Generating OpenAPI Specs on the Fly with NestJS and TypeScript - Andy Primawan
Tired of manually updating your OpenAPI/Swagger documentation every time you change your NestJS API? This guide shows you how to automate the entire process. Leverage decorators and DTOs to create a single source of truth, ensuring your documentation is always in sync with your code, effortlessly.
Introduction
As fullstack engineers, we wear many hats. We design databases, craft user interfaces, and build the APIs that connect them. A crucial, yet often neglected, part of building great APIs is creating clear, accurate, and up-to-date documentation. The OpenAPI Specification (formerly Swagger) has become the industry standard for defining RESTful APIs, but maintaining the documentation manually can be a significant drain on productivity.
What if your code could be your documentation? With NestJS, a progressive Node.js framework, this isn't just a fantasy. NestJS provides powerful tools that integrate directly with your application's source code to generate a complete OpenAPI specification on the fly.
The Problem Statement: The Pain of Manual Documentation
Let's be honest: no one enjoys manually updating a swagger.yaml file. This traditional approach is fraught with problems that every developer has experienced:
- Documentation Drift: This is the biggest offender. A developer adds a new optional query parameter or changes a response field. They forget to update the OpenAPI document. Suddenly, the documentation is a lie, causing confusion for frontend developers, QA, and anyone consuming your API.
- Tedious and Error-Prone: Writing YAML or JSON by hand is repetitive and boring. It's easy to make syntax errors, indentation mistakes, or misspell a data type, leading to invalid specs that waste time debugging.
- Violating DRY (Don't Repeat Yourself): You've already defined your data structures in TypeScript using classes or interfaces for your request bodies, parameters, and responses. Manually transcribing these into a separate YAML file is a classic violation of the DRY principle. It's duplicate work that is bound to go out of sync.
This friction leads to outdated documentation, which is often worse than no documentation at all.
The Solution: Code-First with @nestjs/swagger
The NestJS ecosystem provides a brilliant solution with the official @nestjs/swagger package. This module uses decorators to augment your controllers, models (DTOs), and endpoints with the metadata needed to build a comprehensive OpenAPI document.
Here’s how you can set it up to generate documentation automatically.
Step 1: Installation
First, you need to add the required packages to your project.
npm install --save @nestjs/swagger
Step 2: Bootstrap in main.ts
The magic begins in your main.ts file. Here, you'll configure and initialize the Swagger module.
src/main.ts
import { NestFactory } from '@nestjs/core';
import { AppModule } from './app.module';
import { SwaggerModule, DocumentBuilder } from '@nestjs/swagger';
import { ValidationPipe } from '@nestjs/common';

async function bootstrap() {
  const app = await NestFactory.create(AppModule);

  // This enables validation decorators to be used by Swagger
  app.useGlobalPipes(new ValidationPipe());

  // Base configuration for the OpenAPI document
  const config = new DocumentBuilder()
    .setTitle('Dojotek AI Chatbot backend')
    .setDescription('Dojotek AI Chatbot allows you to build, configure, run, monitor multiple Chatbot AI LLM RAG; and expose to multiple channels (Slack, Microsoft Team, Lark, Discord, Telegram, WhatsApp, etc).')
    .setVersion('1.0')
    .addBearerAuth()
    .build();

  // Create the full OpenAPI document
  const document = SwaggerModule.createDocument(app, config);

  // Set up the Swagger UI endpoint
  SwaggerModule.setup('api', app, document);

  await app.listen(3000);
}
bootstrap();
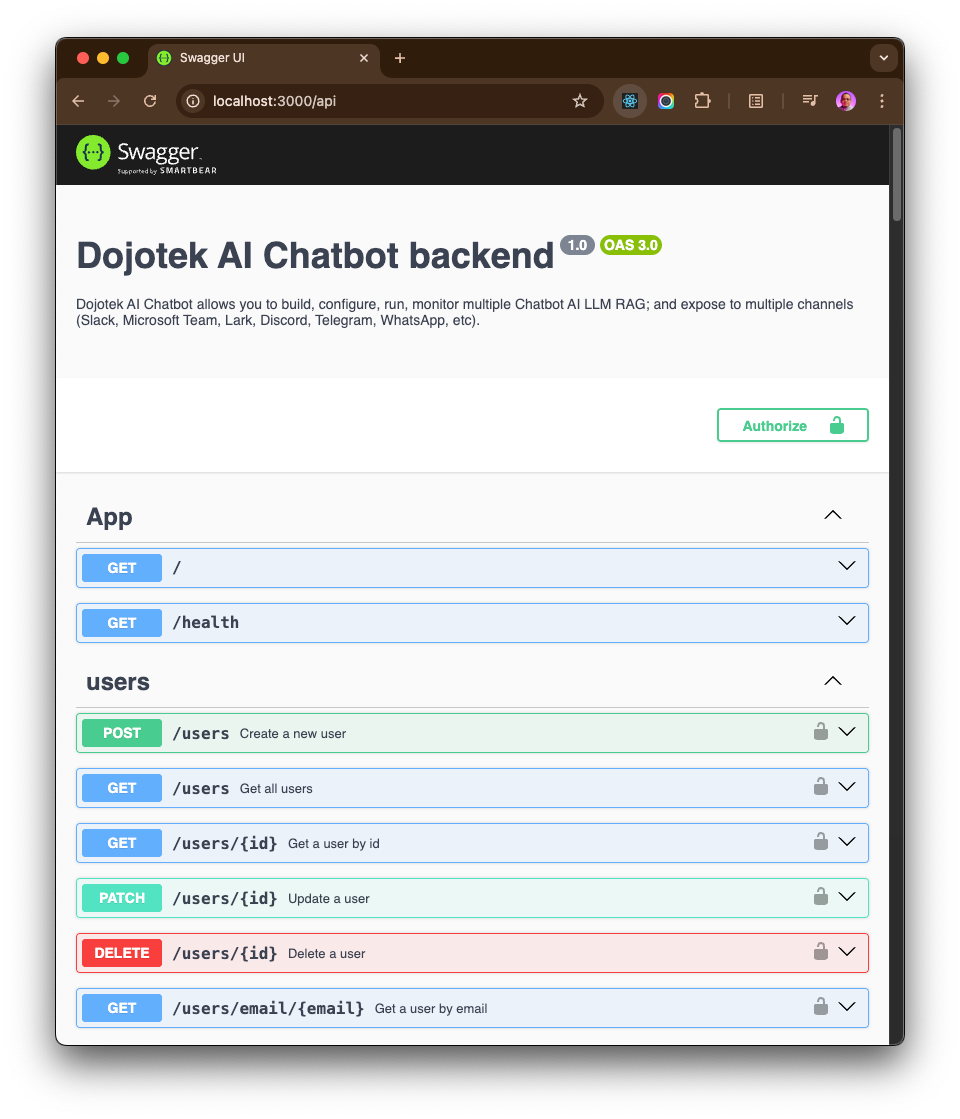
With just this code, if you run your application and navigate to http://localhost:3000/api, you will already see the Swagger UI! It won't have any endpoints yet, because we haven't described them.
Step 3: DTOs as the Single Source of Truth
This is the most powerful part. Instead of defining your payload schemas in YAML, you define them once as TypeScript classes (DTOs - Data Transfer Objects). By using decorators from class-validator and @nestjs/swagger, you get validation and documentation from the same code.
Let's create a DTO for creating a new user.
src/users/dto/create-user.dto.ts
import { ApiProperty } from '@nestjs/swagger';
import { IsEmail, IsString, MinLength } from 'class-validator';

export class CreateUserDto {
  @ApiProperty({
    example: 'John Doe',
    description: 'The full name of the user.',
  })
  @IsString()
  @MinLength(2)
  fullName: string;

  @ApiProperty({
    example: '[email protected]',
    description: 'The email address of the user.',
  })
  @IsEmail()
  email: string;

  @ApiProperty({
    description: 'The user password. Must be at least 8 characters.',
    minLength: 8,
  })
  @IsString()
  @MinLength(8)
  password: string;
}
Notice how @ApiProperty() provides the documentation (description, example), while decorators like @IsEmail() and @MinLength() provide validation rules. The @nestjs/swagger package reads both to build the schema.
Step 4: Annotate Your Controllers
Now, let's use our DTO in a controller and add the final decorators to describe the endpoint, its parameters, and its possible responses.
src/users/users.controller.ts
import { Controller, Post, Body, Get, Param, HttpStatus } from '@nestjs/common';
import { UsersService } from './users.service';
import { CreateUserDto } from './dto/create-user.dto';
import { ApiBearerAuth, ApiTags, ApiOperation, ApiResponse } from '@nestjs/swagger';
import { User } from './entities/user.entity'; // Assuming you have a User entity/DTO for responses

@ApiBearerAuth() // Mark that endpoints under the "users" tag protected by Authorization Bearer HTTP header
@ApiTags('users') // Groups all endpoints under the "users" tag in Swagger UI
@Controller('users')
export class UsersController {
  constructor(private readonly usersService: UsersService) {}

  @Post()
  @ApiOperation({ summary: 'Create a new user' })
  @ApiResponse({
    status: HttpStatus.CREATED,
    description: 'The user has been successfully created.',
    type: User, // This will link to the User schema for the response
  })
  @ApiResponse({
    status: HttpStatus.BAD_REQUEST,
    description: 'Invalid input data.',
  })
  create(@Body() createUserDto: CreateUserDto) {
    // The ValidationPipe automatically validates the incoming body against CreateUserDto
    return this.usersService.create(createUserDto);
  }

  @Get(':id')
  @ApiOperation({ summary: 'Get a user by ID' })
  @ApiResponse({
    status: HttpStatus.OK,
    description: 'User found.',
    type: User,
  })
  @ApiResponse({ status: HttpStatus.NOT_FOUND, description: 'User not found.' })
  findOne(@Param('id') id: string) {
    return this.usersService.findOne(+id);
  }
}
What did we achieve here?
@ApiTags('users'): Organizes our endpoints.@ApiOperation({ summary: '...' }): Provides a human-readable summary for the operation.@ApiResponse({ ... }): Describes a possible HTTP response. We can define multiple for success cases (200, 201) and error cases (400, 404, 403).@Body() createUserDto: CreateUserDto: NestJS knows to expect a request body and validate it against ourCreateUserDto.@nestjs/swaggeruses this exact same information to document the request body schema automatically.type: User: By referencing another class (User) as the response type, Swagger can generate and link to the response schema.
Now, when you reload your Swagger UI at /api, you will see a fully documented set of endpoints, complete with schemas for request bodies and responses, all generated directly from your TypeScript code. If you add a field to CreateUserDto, the documentation updates instantly on the next application reload.
Conclusion
By adopting a code-first approach with NestJS and @nestjs/swagger, you eliminate the tedious and error-prone process of manual API documentation. Your codebase becomes the single source of truth, leading to:
- Always-Accurate Docs: Your documentation evolves naturally with your code.
- Increased Developer Velocity: Stop wasting time on YAML files and focus on building features.
- Improved Collaboration: Frontend, backend, and QA teams can all trust the same, auto-generated, interactive documentation.
This isn't just a convenience; it's a best practice for building robust, maintainable, and well-documented APIs in a modern development environment. You get validation and documentation for the price of one, which is an incredible return on investment.
Example Code
You can find a complete, runnable example of this implementation on GitHub repository of Dojotek AI Chatbot backend: